⛺ How To Set Up A Tent Step By Step
✈️ The Smart Traveler's Toolkit
Whether you're heading to the beaches of Thailand or exploring cobblestone streets in Prague, these are the 5 travel essentials that seasoned globetrotters and travel editors universally recommend — the gear that makes every trip smoother, lighter, and more enjoyable.
🧳 Away The Carry-On Hard Shell Suitcase
The single most recommended carry-on in the travel world right now. Travel editors and frequent flyers rely on its durable polycarbonate shell, 360° spinner wheels, and built-in compression system to maximize packing space while gliding effortlessly through any airport terminal.
🎒 Osprey Daylite Plus Daypack
The go-to daypack that professional travel bloggers and adventure guides swear by for city explorations and shore excursions. Its lightweight, breathable mesh back panel keeps you cool in tropical heat, while the 20L capacity fits everything you need — camera, water bottle, sunscreen, and souvenirs — without weighing you down.
📦 Eagle Creek Pack-It Reveal Cube Set
The packing organization system that experts credit with fitting 30% more into any suitcase. These translucent, color-coded cubes separate tops, bottoms, and accessories so you spend zero time digging through your bag — universally recommended by professional packers and minimalist travel coaches worldwide.
🎧 Sony WH-1000XM5 Noise-Cancelling Headphones
The undisputed king of travel headphones that flight attendants and business travelers universally recommend. The industry-leading noise cancellation erases engine roar, crying babies, and airport chaos — giving you 30 hours of blissful silence for long-haul flights, road trips, and train journeys.
🔋 Anker PowerCore 26800 Portable Charger
The portable power bank that travel photographers and digital nomads rely on to keep devices charged through full-day excursions without hunting for outlets. With enough capacity to charge a phone 6+ times over, it's the non-negotiable lifeline for capturing every sunset, navigating unfamiliar cities, and staying connected abroad.
The call of the wild whispers, a silent invitation to leave the everyday behind and embrace the quiet majesty of nature.
I remember my first solo camping trip, fumbling with poles under a canopy of stars in the Redwood National Park, realizing the simple act of setting up my shelter was the first step into a deeper connection with the earth.
This guide distills years of sun-drenched mornings and starlit nights into a clear, evocative path, ensuring your first or hundredth tent setup is as seamless as a mountain stream.

Quick Overview
Embark on an adventure where your temporary home rises from the earth, promising comfort and shelter under an open sky. You’re about to master the art of creating your personal sanctuary in the wilderness.
- Time needed: 15-30 minutes (Beginner), 5-10 minutes (Experienced)
- Difficulty: Beginner
- What you’ll need: Tent (with poles, stakes, rainfly), ground tarp, clear space
Step-by-Step Instructions
Step 1: Choose Your Sacred Spot
Before any fabric unfurls, pause and survey your surroundings. Seek a patch of ground that feels right, a place where the earth breathes comfort.
Look for level terrain, free from sharp rocks or roots that could puncture your tent floor or disturb your sleep.
Consider the morning sun’s gentle touch, or the shade of a venerable tree, and always position your tent away from potential water runoff paths.
Pro Tip: Gaze upwards. Are there any dead branches or “widowmakers” looming overhead? A safe campsite is a happy campsite, ensuring peaceful slumber without worry.
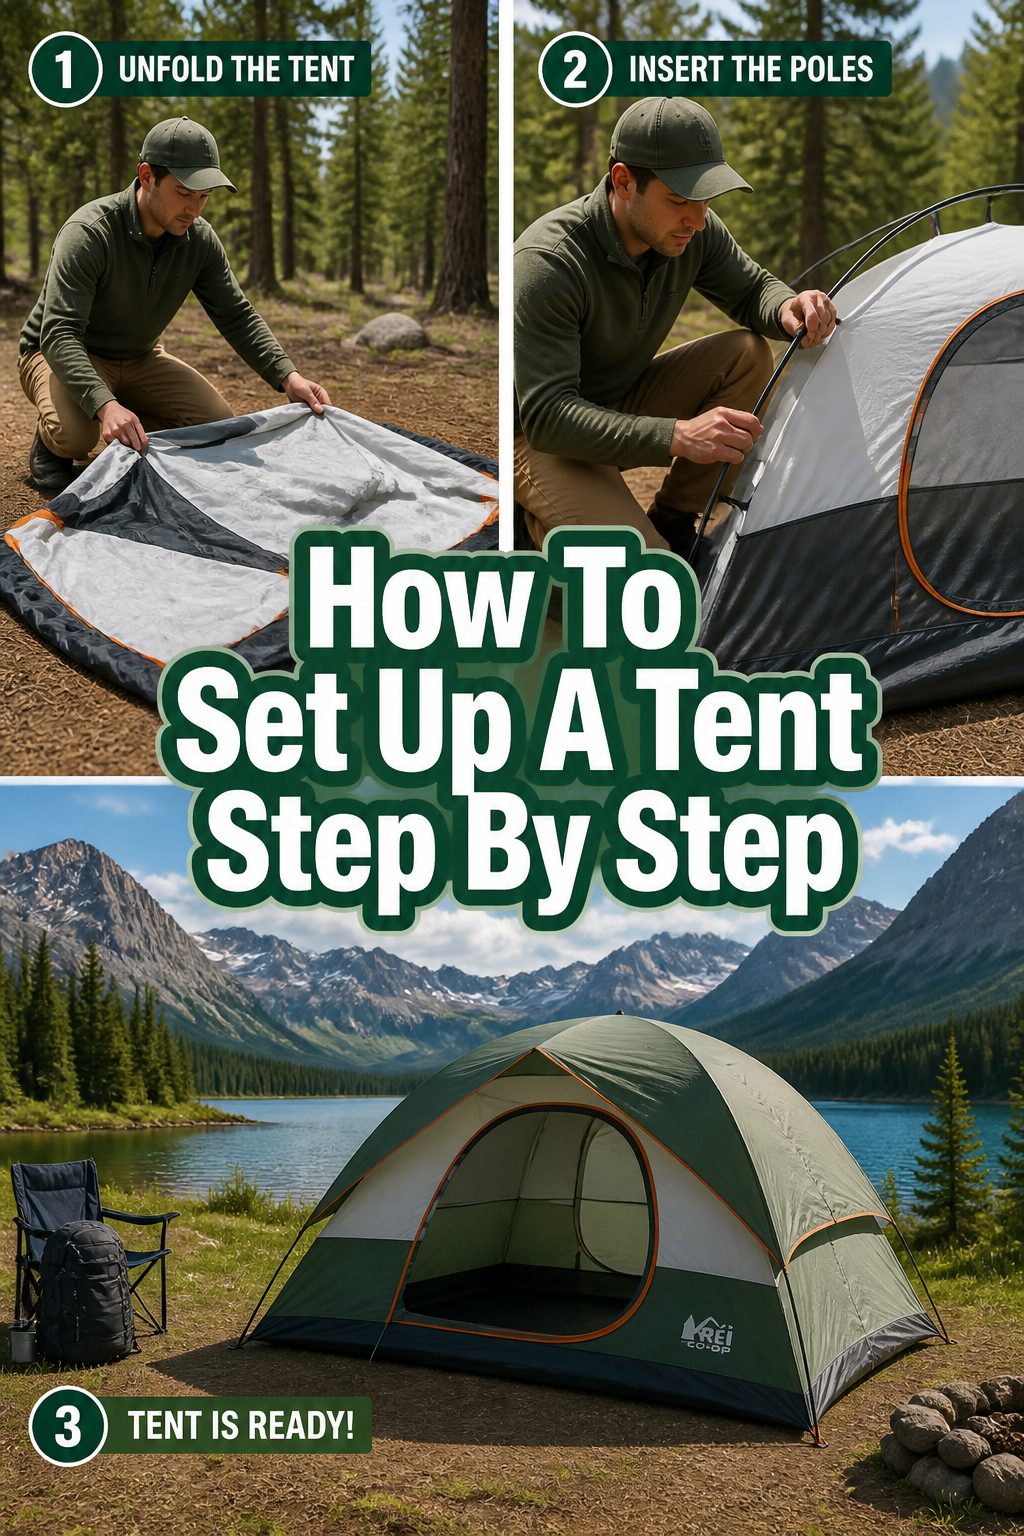
Step 2: Unfurl the Canvas of Your Dreams
Lay your chosen ground tarp flat on your selected spot. This protective layer acts as a barrier against moisture and abrasion, extending the life of your tent’s floor.
Carefully unroll your tent body directly on top of the tarp, spreading it out like a picnic blanket awaiting its feast.
Orient the tent so the door faces your preferred view – perhaps a distant peak, a winding river, or the path to your campfire.
Step 3: Assemble the Bones of Your Home
Gather your tent poles. These are typically shock-corded, meaning they’re strung together with an elastic cord, making assembly intuitive.
Gently extend each pole section, allowing the elastic to pull them together, until they click into rigid, sturdy lengths.
Ensure each section is fully seated into its connector, creating a strong framework for your shelter.
Pro Tip: Lay out all your poles in their intended configuration on the ground next to the tent body. This visual guide helps prevent confusion, especially with tents that have varying pole lengths.
Step 4: Weave the Poles Through the Sleeves
Most tents feature sleeves or clips designed to hold the poles. For sleeve-style tents, feed the assembled poles through the fabric tunnels that crisscross the tent’s body.
Push gently but firmly, guiding the pole until its end reaches the grommet or pin at the opposite corner.
If your tent uses clips, attach each clip directly to the poles, starting from one end and working your way across, lifting the fabric as you go.
Step 5: Raise Your Shelter to the Sky
Once all poles are in place, the tent body will begin to take shape. For sleeve tents, insert the pole ends into the grommets or pins at each corner of the tent base.
This action creates tension, causing the tent to arc upwards, forming its dome or tunnel structure.
Work methodically, ensuring each pole end is securely seated, and the fabric is evenly distributed without excessive pulling or strain.
Pro Tip: If you’re setting up alone, anchor one corner of the tent with a stake before inserting the final pole. This provides leverage and prevents the tent from sliding as you apply tension.
Step 6: Anchor Your Haven to the Earth
Now that your tent stands tall, it’s time to secure it against the whims of the wind. Locate the webbing loops or stake points at each corner of the tent base.
Using your tent stakes, drive them into the ground at a 45-degree angle away from the tent, ensuring they penetrate deeply for maximum hold.
A firm, even tension on the tent floor prevents flapping and creates a stable foundation.
Step 7: Drape the Rainfly with Care
The rainfly is your tent’s primary shield against rain, wind, and morning dew. Unfold it and carefully drape it over the erected tent body.
Align the doors and vents of the rainfly with those of the main tent body for proper ventilation and access.
Many rainflies have color-coded webbing or buckles that correspond to specific corners of the tent, simplifying the alignment process.
Pro Tip: If a sudden gust of wind catches your rainfly, try to hold it down with one hand while quickly attaching two opposing corners. This minimizes its sail effect and makes securing it much easier.
Step 8: Cinch and Guy Out for Stormy Skies
Once the rainfly is draped, secure it to the tent poles or base using the buckles, Velcro straps, or elastic loops provided.
Next, extend the guy lines – these are the ropes attached to the rainfly – and stake them out, pulling the rainfly taut away from the tent body.
This creates an air gap between the rainfly and the inner tent, crucial for ventilation and preventing condensation, while also bolstering its wind resistance.
Common Mistakes to Avoid
Choosing the Wrong Site
Many eager campers, in their rush to set up, overlook the critical first step of site selection. Pitching your tent in a low-lying area invites a soggy night should rain arrive, turning your peaceful retreat into a waterlogged ordeal.
Always take a moment to assess the drainage, potential for falling debris, and the general exposure to wind before committing to a spot. A few extra minutes of scouting save hours of discomfort.
Forgetting the Ground Tarp
Skipping the ground tarp seems like a minor oversight, but it drastically reduces your tent’s lifespan and comfort. Without this protective layer, sharp objects on the ground can puncture the tent floor, and moisture will wick directly into your sleeping area.
Always use a ground tarp that is slightly smaller than your tent’s footprint to prevent rainwater from pooling between the tarp and the tent, ensuring a dry and comfortable interior.
Not Guiding Out the Rainfly
Many beginners only secure the rainfly at the base, leaving the guy lines unused. This leaves the rainfly flapping loosely in the wind, reducing its effectiveness against rain and causing noisy disturbances throughout the night.
Properly tensioning the guy lines pulls the rainfly away from the inner tent, maximizing airflow, minimizing condensation, and creating a much more stable and quiet shelter in breezy conditions.
Rushing the Pack-Up
While not strictly a setup mistake, many campers rush the packing process, stuffing their tent haphazardly into its bag. This leads to bent poles, wrinkled fabric, and a much harder time setting it up on the next adventure.
Take the time to fold your tent neatly, roll it tightly, and ensure poles and stakes are properly stowed. This simple act of care preserves your gear and makes future setups a breeze.
Troubleshooting
Tent is Sagging or Unstable
A tent that sags lacks proper tension, often due to improperly inserted poles or loose stakes. Re-check each pole end, ensuring it’s fully seated in its grommet or clip, creating a firm arc.
Then, re-evaluate your stakes. They should be driven firmly into the ground at a 45-degree angle, pulling the tent fabric taut from all corners. Adjusting these points usually resolves the instability.
Water is Leaking Inside
Leakage often stems from a compromised rainfly or improper guying. First, inspect the rainfly for any tears or worn-out seams that might need sealing with a seam sealant.
Next, ensure the rainfly is properly tensioned and pulled away from the inner tent body by the guy lines. If the rainfly touches the inner tent, water can transfer through the fabric. Also, check that your ground tarp isn’t extending beyond the tent’s footprint, channeling water underneath.
Zippers are Stuck or Difficult
Tent zippers can become stubborn due to fabric getting caught or the zipper teeth accumulating dirt. Gently pull the fabric away from the zipper teeth as you operate it, avoiding forceful tugs.
If dirt is the issue, clean the zipper with a small brush or old toothbrush. Applying a silicone-based zipper lubricant can also help smooth their operation, extending their life and preventing frustration.
Key Takeaways
- Site Selection is Paramount: Choose a level, clear, and well-drained spot, free from hazards.
- Protect Your Investment: Always use a ground tarp, tucked just under your tent’s footprint.
- Master the Poles: Assemble them carefully and ensure they are fully seated for structural integrity.
- Tension is Your Friend: Properly stake the tent and guy out the rainfly for stability and weather protection.
- Practice Makes Perfect: Set up your tent in your backyard before your first trip to build confidence.
- Care Extends Life: Pack your tent neatly and store it dry to ensure many adventures to come.
Frequently Asked Questions
Can I set up a tent by myself?
Absolutely! Most modern tents are designed for solo setup, especially dome and tunnel styles. Practice is key, and following the step-by-step process, especially anchoring one side first, makes it much easier.
What if it starts raining during setup?
If rain threatens, prioritize getting the rainfly over the tent body as quickly as possible, even if the inner tent isn’t fully tensioned. Some tents are designed for “fly-first” pitch, allowing you to set up the rainfly as a shelter before assembling the inner tent.
How do I choose the right size tent?
Consider the number of occupants plus any gear you’ll bring inside. A “2-person” tent is often snug for two people with gear, so many prefer to size up. Think about your comfort needs and the type of trips you’ll take.
How do I pack up my tent after use?
Ensure your tent is completely dry before packing to prevent mildew. Remove all stakes and poles, then fold the tent body neatly into a rectangle matching the length of your poles. Place the poles and stakes on top, then roll everything tightly, squeezing out air as you go, before securing it in its stuff sack.
Our Top Recommended Finds
- Lightweight Ground Tarp: Essential for protecting your tent floor from abrasion and moisture, extending its life significantly.
- Tent Footprint (Brand Specific): Designed to perfectly match your tent’s dimensions, offering superior protection and often integrating with the tent’s pole system for a seamless pitch.
- Compact Repair Kit: A small kit with pole splints, fabric patches, and seam sealer can be a lifesaver for unexpected tears or breaks in the field.
Embrace the Horizon, Pitch Your Dreams
The wilderness awaits, not just as a backdrop, but as an active participant in your story. Setting up your tent is more than a task; it’s a ritual, a declaration of your intent to connect with the raw beauty of the world.
Feel the fabric in your hands, listen to the gentle rustle as the poles find their place, and watch as your temporary home emerges from the earth, ready to shelter your adventures.
Don’t let hesitation hold you back. Grab your tent, step outside, and let the journey begin today. The crisp air, the starlit nights, and the profound peace of your own making are calling.